Offline Conversion Tracking with Google Ads and Marketo

Questions, feedback, suggestions? Check out the comments
Before I dig in more deeply, it’s important to note that I last did this for a real company in the fall of 2020. That’s before everything moved over to GA4 and there’s also a chance some of these integrations have been updated since then. I also haven’t tried this solution in the wild since then, so there’s a chance your mileage may vary. That asterisk out of the way, here’s how I went about it.1
Introduction
First, I looked at the direct integration between Marketo and Google Ads. It seemed like it might work, but it felt limiting. Then I looked at the Salesforce integration with Google Ads. Same story. It only looked at the Lead and Opportunity objects, and my ability to customize was also limited.
So instead I leveraged Google Analytics as a kind of middleman. Events in Google Analytics can be passed to Google Ads as conversions. Generally, you do this for events on your site. But using Measurement Protocol, you can also send offline events to Google Analytics through webhooks. That means you can essentially ping Google Analytics with offline conversion events triggered by whatever activity in Marketo you desire. Lead status updates are a clear candidate, but you could go absolutely wild with this approach if you wanted to (rate limits accepting).
The basic setup here looks something like this:
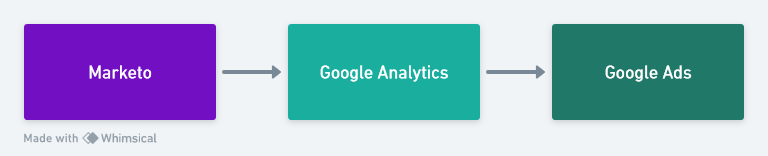 Basic Pipeline: Marketo to Google Analytics to Google Ads
Pulling this off requires passing a few data points into Marketo with each submission, some webhook building, and a fair bit of testing. But it gives you a lot of flexibility and it should make whoever runs your ads happy.2
Passing Client ID to Marketo
Sending an offline event to Google Analytics requires requires a few pieces of information:
API secretfor your GA4 propertyMeasurement IDfor your data streamClient IDfor the user completing the event
Your API Secret and your Measurement ID can both be found within GA4, nested in the ‘Data Streams’ portion of the Admin area. You’ll likely want to create a new API key for this purpose, so go ahead and give it an appropriate nickname and hold onto the ‘Secret value’ it gives you.
Client ID is where things start to get more complicated (here’s a good overview of what Client ID is and how it works).3 To correctly tag the events we’ll be creating using Measurement Protocol back to GA4 and attribute them to an individual, we need to leverage Client ID as a unique identifier. It’s worth noting that Client ID does expire and that a given site visitor will have a different Client ID associated with them for each device they use to visit your site; it’s not a very durable way to identify people. But for our purposes, it will serve to the job done.
You’ll need to create a field in Marketo for Client ID and add it to all your forms as a hidden field. You’ll then need to add additional code to your Marketo form embeds to capture Client ID from the _ga cookie and pass it to that hidden field. There’s a lot of guides on how to do this kicking around Marketo Nation and different sites, but you’ll want to leverage the Marketo Forms 2.0 JS API.4
This is all in service of building your webhook using the GA4 Event Builder:
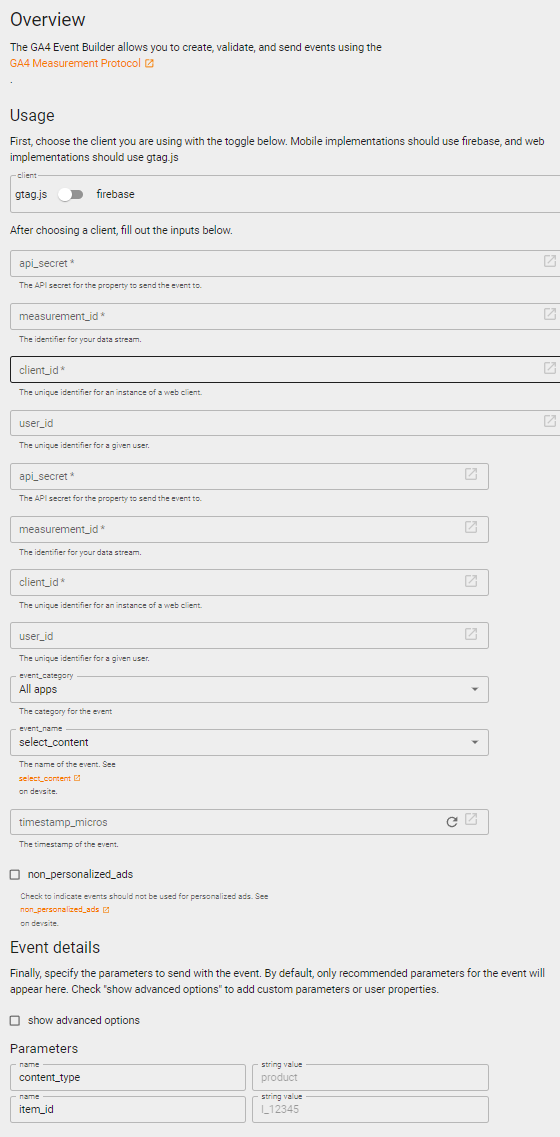 Google’s Event Builder Form
Event Building
Ok, so you’re passing Client ID into Marketo consistently. Now it’s time to put that to use. After a momentary…
Digression
From a technical standpoint, Client ID is serving as a ‘join key’ between Google Analytics and Marketo; a shared identifier saying “this person in Marketo is the same as that person in Google Analytics.” Join keys like this get data nerds like me very very excited, because each time you build a connection like this you’re giving future analysts a powerful way to unify data across your systems.
Back to it
Now we’re going to work on building our Measurement Protocol events. For testing purposes, I recommend using a service like Postman to send API requests to GA4.
First, decide what you want your event to be called. I’m going with lifecycle_progression for the time being, and setting a custom event property Stage to the prospect’s current lead status. The Event Builder won’t let you input your own event name, but it’s totally possible to edit the payload at a later date to the value you want to get something like this:
{
    "client_id": "Client ID here",
    "non_personalized_ads": false,
    "events": [
        {
            "name": "lifecycle_progression",
            "params": {
                "Status": "MQL"
            }
        }
    ]
}
I also recommend using your own Client ID to run tests. You won’t mess up anyone else’s data and it’s also easier than trying to track down someone else’s. To retrieve your own Client ID, head to your site, open the developer console, and head over to the application area. Then pop open the ‘Cookies’ folder and grab the value from the _ga cookie. That’s what we’ll use for all of our testing.
To run a test in Postman, you’ll need to build a POST request using the endpoint ‘https://www.google-analytics.com/mp/collect?api_secret=$your-api-id&measurement_id=$your-measurement-id’, replacing the query parameters based on what you pulled out of your GA4 Admin area. Then set your Content-Type in the ‘Headers’ area to ‘application/json’ and paste your payload into the ‘Body’ area as raw JSON. Then hit Send!
It can take a while for the event to show up in GA4, but I’ve had some luck heading to ‘Realtime’ and scrolling down to the ‘Event count by Event name’ card. If everything’s working as intended, you should see you lifecycle_progression event there, and if you click on it you should be able to drill down to find a Stage value of ‘MQL’ like so:
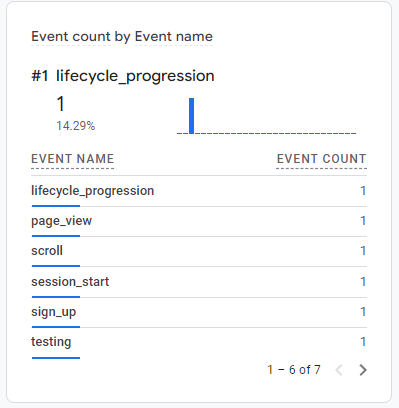 Event Tracking Example
 Lifecycle Stage Values
Once you’ve confirmed that’s in a good spot, it’s time to set this event as a Conversion.
Conversion Setup
First, we build a Custom Event for ‘MQL’, filtering for our event using the name and Stage values:
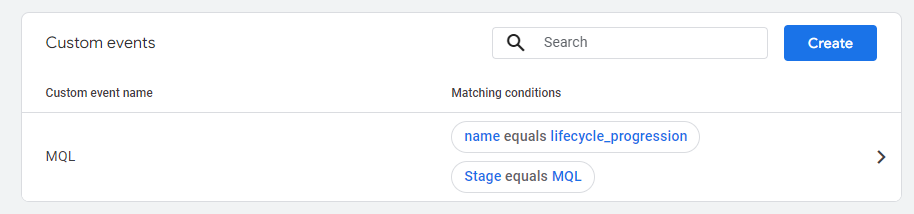 MQL Custom Event Setup
Then we define a Conversion using the same name:
 MQL Conversion Event
Lastly, the connection to Google Ads. Head to Goals > New conversion action > Import > Google Analytics 4 properties and your new conversion should show up. Select it and you’re good to go!
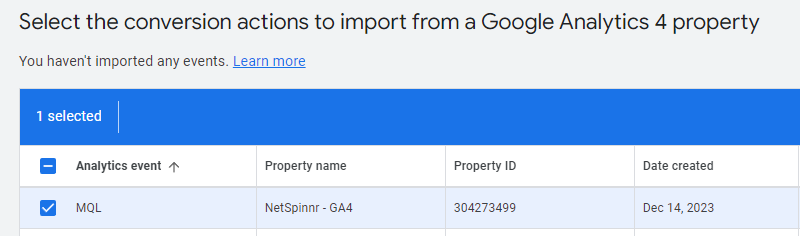 Importing the GA4 conversion into Google Ads
Bringing it all together with Marketo
Head over to ‘Webhooks’ in Marketo and use what we did with Postman as a guide. You’ll want to set Request Token Encoding to JSON and use tokens heavily so you only need to build one webhook to power the entire integration.
Your webhook Template might look something like:5
{
    "client_id": "lead.Google Client ID",
    "non_personalized_ads": false,
    "events": [
        {
            "name": "lifecycle_progression",
            "params": {
                "Status": "lead.LeadStatus"
            }
        }
    ]
}
Then it’s just a matter of adding this webhook into your lifecycle management Smart Campaigns and you’re pretty much good to go! Once the data is flowing you can easily set up additional Custom Events and Conversions in GA4 and Google Ads for each of your stages. Your Ads team will have all the data they need to run offline conversion optimization, and you’ll have learned a lot more about how these systems process and share data in the process.
Best of luck and feel free to contact me with any questions or comments!
Older Resources that inspired this approach: Archived upBuild post | 2015 Stephen Hammel Guide↩︎
Offline conversions often aren’t super helpful for B2B advertising optimization. Google Ads auto-optimization relies on a fairly high conversion volume and most B2B businesses don’t get enough qualified leads from Marketing to actually use that functionality. That said, you can likely still use this data to manually optimize paid campaigns. Your mileage may vary!↩︎
Google’s docs on
Client IDseem to have gone missing post-deprecation of GA4. I’m going to keep trying to track them down, but owox’s overview does a good job explaining the basic concept.↩︎I’d offer my own version but it’s tailored for Universal Analytics, not GA4 and I haven’t needed to do this in a while.↩︎
Double curly-brackets omitted so this renders appropriately on my site↩︎
Written by Jack Segal. Shoot me an email with questions or comments, and if you'd like to support my writing, you can send me a tip using Stripe!
Date
2023-12-14Subscribe
Fill out the form to get notified whenever a new post goes live!